I decided to build a small mediaserver for our home and wanted it to be automated as much as possible. This post will go trough the steps taken to setup and configure my new Mediacenter.
For operating system I choose Ubuntu Server 22.04 LTS. I have some experience with Ubuntu already and for a server system it seems to be the best choice. I'm using Plex already so this choice was not to be made. Even more after I recently found out about *arr software to automate my audio & movie downloads. So let's jump into it.
When I setup everything the first time I came across the issue that many software is avaiable as docker containers only. To say it direct - I don't like docker. It makes no sense to me on a pure dedicated server wich is aimed to be resource saving as much as possible. So we will just install everything natively and skip docker and snap completely.

Content
- Setting up base system
- Installing and configure software
- Install Nvidia graphics driver
- Install Nano
- Install Samba and configure share
- Additional harddrives and mountpoints
- Install PlexMediaServer
- Installing "Homepage" as overview panel
- Serv*arr applications
- Install qBittorrent-nox
- Install Ombi
- Install Bazarr
- Optional: Install Unpackerr
- Optional: Install Ajenti webpanel
- Configuration
- Folder structure
Setting up base system
First of all I started setting up my Ubuntu Server 22.04 base system. I chose to install from USB-Stick created with Rufus, wich makes the process very easy.
I used the hardware from an older gaming pc with Nvidia GTX1650 graphics card, 3x 1TB Harddrive (non SSD), 16GB of RAM and just decent parts all over. As I don't have SSD actually, I decided to run 2x 1TB as a Raid 0 to be more performant. The 3rd Harddrive I keep for my temporary downloads. As it's meant to be a media server I needed more space and added another 8TB Harddrive to store all media.
When installing Ubuntu Server I just installed the bare minimum. The only option I chose is to setup SSH for accessing the server remotely after initial setup. That's not needed but makes things much easier using putty on my windows PC and be able to also copy/paste commands and more from or to the terminal.
With Ubuntu Server 22.04 there is a bug when creating the raid. It does not show the labels of the harddrives. But you can just blindly choose all options by using arrow down and space to "mark" them. After doing this all harddrives will show as part of the raid. You can individually remove the ones that are not needed. So I end up with my Raid 0 containing two of my harddrives mounted to Root (/). I did not mount the other drives yet and will do this later individually. Just go trough the setup of Ubuntu Server 22.04 following the steps or using one of many tutorials in the internet. Once installed you will have to reboot and find yourself at the prompt to login your fresh system.
Installing and configure software
first of all we need to update our sources. After login to the system use the following commands:
sudo apt update && sudo apt upgrade
It will update the sources and upgrade packages that have updates available.
Then let's start to add what we need more.
Install nvidia graphics driver
I chose to install nvidia drivers optimized for gpu processing.
sudo ubuntu-drivers -gpgpu
Install nano text editor
This is only necessary if you chose the bare minimal installation
apt install nano
Install samba and configure shares
sudo apt install samba
After this I setup my homedirectories where I want to mound my harddrives and same time will share this as the root of my files.
mkdir /sharesmkdir /shares/mediamkdir /shares/tempmkdir /shares/configmkdir /shares/config/homemkdir /shares/config/optmkdir /shares/temp/downloadmkdir /shares/temp/downloadtmp
now we can edit the configuration
nano /etc/samba/smb.conf
add the folling lines to the very end of your smb.conf:
[fileshare] comment = Root shares path = /shares read only = no browsable = yes
save with CTRL+o, exit with CTRL+x. Then set a password for samba. Note: Samba has it's own password and is not using the account password.
smbpasswd -a [username]
(replace [username] with yours)
now the folder we created before should be accessible from your local network by opening \\[yourservername]\fileshare
Additional harddrives and mountpoints
Let's add the harddrives and mount them to our share-root. We need the UUID of the disks and can get it with command:
lsblk -f
it will show you all of your disks including UUID:

write down or copy/paste the UUID of the relevant disks. In my screen you can see there is sdc1 already mounted as this is our raid mounted to root. We want to add sda1 (1 TB) and sdb1 (8 TB). for this we need to edit our fstab file and add the following lines:
UUID=0e68be26-6446-4340-af64-33512578100a /shares/temp ext4 rw,relatime 02UUID=6967ed51-f710-49af-a061-11098e6a9310 /shares/media ext4 rw,relatime 02
I also want to expose my /opt and /home folder to be able to edit some of the configuration files later. For this I add more mountpoints to mount a folder in our shareroot:
/home /shares/config/home none bind 0 0/opt /shares/config/opt none bind 0 0
to remount all from your fstab simply enter
sudo mount -a
to restart your samba server use
sudo service smbd restart
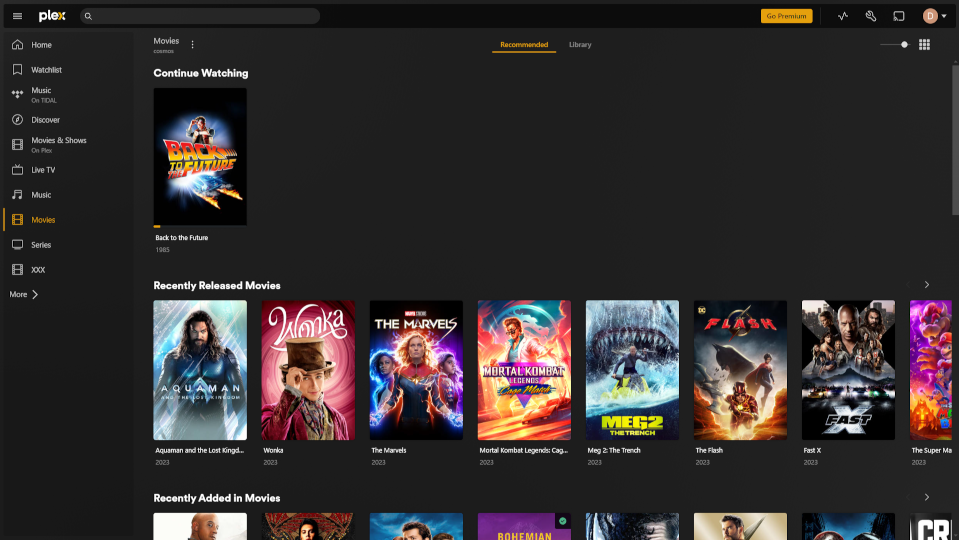
Install PlexMediaServer
we need to add the repo
sudo echo deb [signed-by=/usr/share/keyrings/plex.gpg] https://downloads.plex.tv/repo/deb public main | sudo tee /etc/apt/sources.list.d/plexmediaserver.list
and get the key to this
sudo wget -O- https://downloads.plex.tv/plex-keys/PlexSign.key | gpg --dearmor | sudo tee /usr/share/keyrings/plex.gpg
after this we need update our sources and install plexmediaserver
sudo apt update && apt install plexmediaserver -y
When successfully installed, your Plex Server should be reachable trough: http://[ipOfYourServer]:32400/web
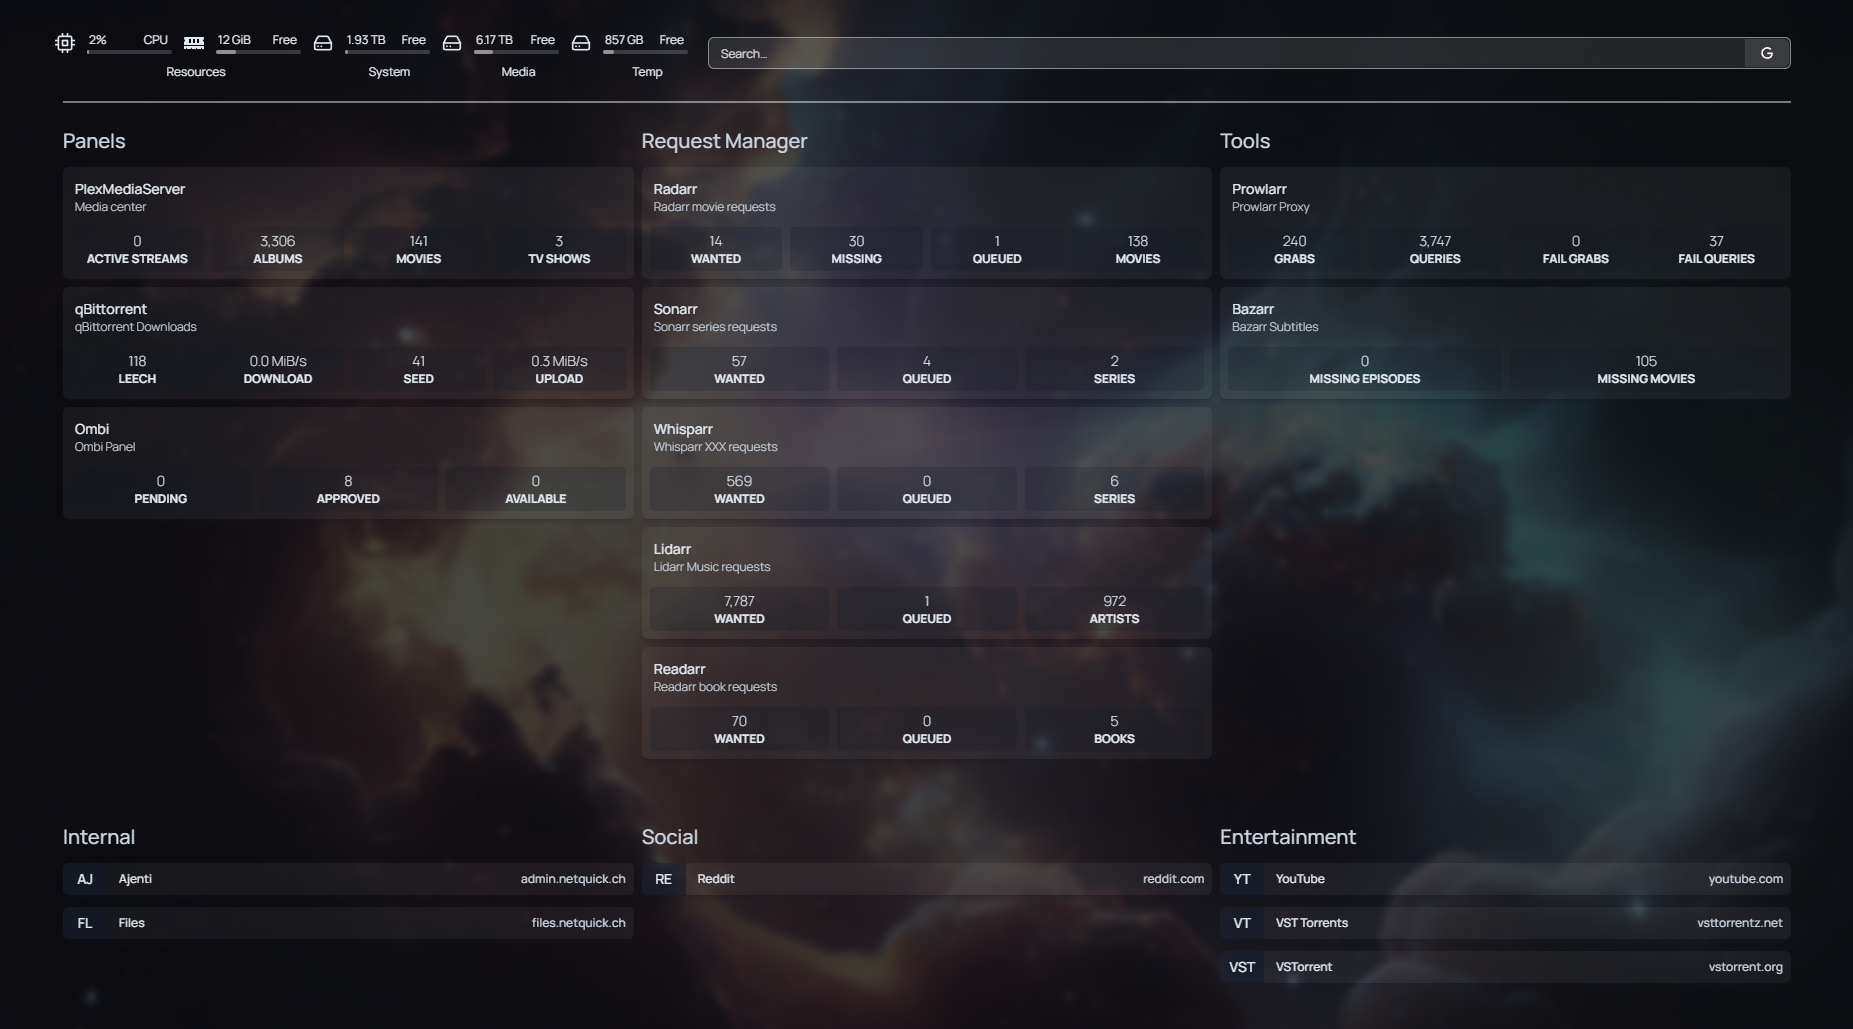
Installing "Homepage" as overview panel
We will want a central place to monitor and access all the services we will add in the next steps. I found "homepage" to be what I need. This is where it comes to some more effort avoiding docker - but it's definitely worth it. So we will build it from sources. First let's add the software we need for this.
sudo apt update && sudo apt install git nodejs npm
sudo npm install -g pnpm
Now let's move in our /opt directory where we want to install homepage.
cd /opt
get the sources:
sudo git clone https://github.com/gethomepage/homepage.gitsudo curl -s https://deb.nodesource.com/setup_16.x | sudo bashcd homepagesudo pnpm installsudo pnpm build
we need to configure a service to have it start automatically at system boot
sudo nano /etc/system/system/homepage.service
paste the following block and save it (CTRL+o, CTRL+x)
[Unit]Description=<(Optional) Description of your project>After=network.target[Service]WorkingDirectory=/opt/homepageExecStart=/usr/local/bin/pnpm start[Install]WantedBy=multi-user.target
start and enable the service
sudo systemctl start homepagesudo systemctl enable homepage
you can check status of the newly created service
sudo systemctl status homepage
from there your panel should be accessible at http://[ipOfYourServer]:3000
Serv*arr applications
Now let's care about the request managers we want/need. There are several *arr applications for different goals:
Radarr: Will check for and download movies
Sonarr: Will check for and download TV-Shows/Series
Lidarr: Will check for and download music
Whisparr: Will check for and download xxx
Readarr: Will check for and download eBooks and Audiobooks
And additionally:
Prowlarr: Manages all trackers and shares them with the previous mentioned *arr
Bazarr: Will search for, download and add subtitles
Radarr/Lidarr/Whisparr/Prowlarr/Readarr
There is an easy to use script to install the 5 mentioned applications. Just only sonarr is not included but will be installed the same easy way in next step.
change to your home directory first
cd /home/[yourUserName]
download the script
sudo curl -o servarr-install-script.sh https://raw.githubusercontent.com/Servarr/Wiki/master/servarr/servarr-install-script.sh
to start the script enter
sudo bash servarr-install-script.sh
Then follow the instructions, use defaults. Means for radarr accept the user "radarr" and group "media". Same for all other installers - user is named after the app and group is always "media".
Sonarr
For sonarr the script can be downloaded and started with
sudo curl -o- https://raw.githubusercontent.com/Sonarr/Sonarr/develop/distribution/debian/install.sh | sudo bash
also with this, accept the suggested name and group.
When everything goes well you should be able to access the new services at:
| Radarr | http://[ipOfYourServer]:7878 |
| Sonarr | http://[ipOfYourServer]:8989 |
| Lidarr | http://[ipOfYourServer]:8686 |
| Whisparr | http://[ipOfYourServer]:6969 |
| Readarr | http://[ipOfYourServer]:8787 |
| Prowlarr | http://[ipOfYourServer]:9696 |
Strangely whisparr is the only one I can memorize the port ;-)
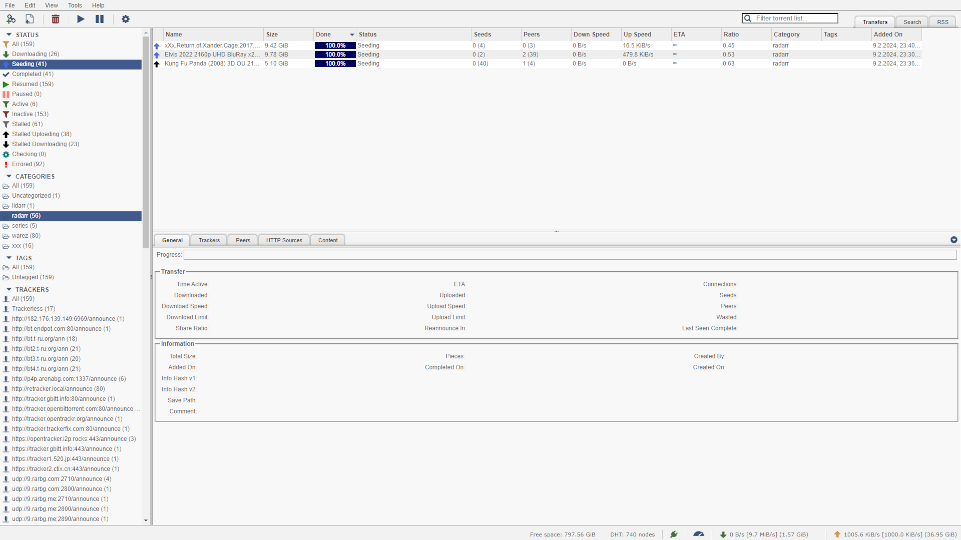
Now we have Plex to manage, show and play all the media. We have the *arr apps to manage our requests and we have homepage to keep it all together. We need a download client to get all the desired media. qBittorrent is the client of my choice but since we run a headless linux server we will install qbittorrent-nox wich is aimed to this.
Install qBittorrent-nox
get qbittorrent-nox from apt
sudo apt install qbittorrent-nox
Then add a user for qbittorrent and also add your own user to that group
sudo adduser --system --group qbittorrent-noxsudo adduser [YourUserName] qbittorrent-nox
Create a service for qbittorrent-nox
nano /etc/systemd/system/qbittorrent-nox.service
paste the following and save (CTRL+o, CTRL+x)
[Unit]Description=qBittorrent Command Line ClientAfter=network.target[Service]Type=forkingUser=qbittorrent-noxGroup=qbittorrent-noxUMask=007ExecStart=/usr/bin/qbittorrent-nox -d --webui-port=8080Restart=on-failure[Install]WantedBy=multi-user.target
start and enable qbittorrent-nox
sudo systemctl start qbittorrent-noxsudo systemctl enable qbittorrent-nox
your downloadpanel should be accessible at: http://[ipOfYourServer]:8080
Please immediately change the default passwort "adminadmin" for user admin:

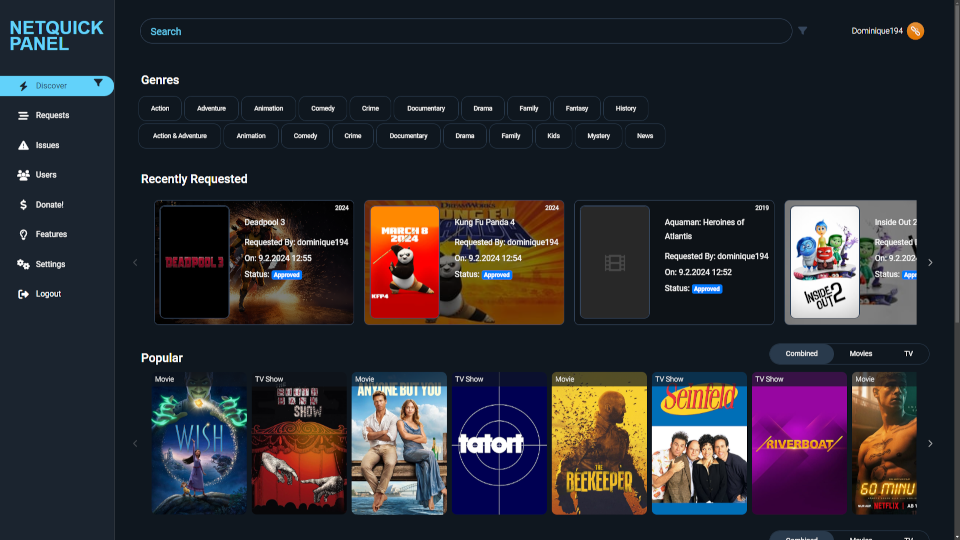
Install Ombi
When searching for new movies/Shows/Music we will be able to just simply add media to our watchlist in plex and the requestmanagers will handle this. But as Plex not contains all available media and searching can be an issue, we will add Ombi as a panel to search and request media files. Again this is where I needed to avoid the default docker container. ahhh... they are everywhere... and in most manuals I found.
Add sources and get the key:
sudo echo "deb [arch=amd64 signed-by=/usr/share/keyrings/ombi-archive-keyring.gpg] https://packagecloud.io/Ombi-app/Ombi/debian/ jessie main" | sudo tee /etc/apt/sources.list.d/ombi.listsudo echo "deb-src [arch=amd64 signed-by=/usr/share/keyrings/ombi-archive-keyring.gpg] https://packagecloud.io/Ombi-app/Ombi/debian/ jessie main" | sudo tee -a /etc/apt/sources.list.d/ombi.listsudo curl -sSL https://packagecloud.io/Ombi-app/Ombi/gpgkey | gpg --dearmor > /usr/share/keyrings/ombi-archive-keyring.gpg
Update apt and get it
sudo apt update && sudo apt install ombi
This does not install the newest version tho - wasn't able to find the issue with this. But you can update to the latest version with the following code.
wget https://github.com/Ombi-app/Ombi/releases/latest/download/linux-x64.tar.gzmkdir -p ./Ombitar -xf linux-x64.tar.gz -C ./Ombisudo service ombi stopsudo cp -R ./Ombi/* /opt/Ombisudo service ombi start
your Ombi Panel should be at http://[ipOfYourServer]:5000
Install Bazarr
To have more subtitles in the movies/shows we download we will use bazarr to automate this process. Again here are some steps needed as we avoid docker. We need python to be installed
sudo apt updatesudo apt install python3-pip python3-distutils python3-pipcd /home/quickwget https://github.com/morpheus65535/bazarr/releases/latest/download/bazarr.zipunzip bazarr.zip -d bazarrcd bazarrpython3 -m pip install -r requirements.txtcd ..sudo mv bazarr /opt/adduser --system --group bazarrsudo chown -R bazarr:bazarr /opt/bazarr
Then we add a service for this
nano /etc/systemd/system/bazarr.service
paste the following
[Unit]Description=Bazarr DaemonAfter=syslog.target network.target
# After=syslog.target network.target sonarr.service radarr.service
[Service]WorkingDirectory=/opt/bazarr/User=bazarrGroup=bazarrUMask=0002Restart=on-failureRestartSec=5Type=simpleExecStart=/usr/bin/python3 /opt/bazarr/bazarr.pyKillSignal=SIGINTTimeoutStopSec=20SyslogIdentifier=bazarrExecStartPre=/bin/sleep 30
[Install]WantedBy=multi-user.target
Start and enable the service
sudo systemctl start bazarrsudo systemctl enable bazarr
Optional: Install Unpackerr
So far I didn't really need this but since I'm downloading other stuff trough qBittorrent as well I thought setting up an automated unpacker will be a great idea.
To install Unpackerr just enter the following.
sudo curl -s https://golift.io/repo.sh | sudo bash -s - unpackerr
You will need to configure all your *arr (Radarr, Sonarr, Lidarr, Readarr, Whisparr) in the config file.
sudo nano /etc/unpackerr/unpackerr.conf
Now this is where it starts to matter how we store the files. See chapter Folder structure for this.
Optional: Install Ajenti webpanel
I also installed ajenti webpanel to have access to many admin functions inclusing file editing, monitoring services and even use integrated terminal. If you want this as well, follow this and the installer:
Change to your home first
cd /home/[yourUserName]
then enter:
sudo curl -o ajenti_install.sh https://raw.githubusercontent.com/ajenti/ajenti/master/scripts/install.shsudo bash ./ajenti_install.sh
you can access with your personal user and elevate to root as most functions will need root access. You can also set a passwort for your root account to login directly as root:
sudo passwd root
Configuration
Now as our software is installed, there is a lot to configure. The first thing I set up is Prowlarr as it will distribute some of the settings later to oder *arr.
First we setup
PlexMediaServer
Open you plex webpanel under http://[ipOfYourServer]:32400/web
I use google authentication with plex and ombi and never needed a local plex account so far.
Add collections for movies, tvshows/series, music and adult movies. Set the root according the Folder structure.
Note: This can absolutely be folders where already files are stored. Plex will import them and all the other tools will also base on this.
Next, let's open Prowlarr and set up some indexers.
Prowlarr
When opening the panel for the first time you will be asked to set login options. I chose "Basic authentication" but disabled it for local adresses. Set a user and a password and copy the API Key somewhere. We will need it later for all apps, so it's easiest to just have them ready.
For now we will add some indexers but we need setup more later and connect prowlarr to radarr, sonarr and co. But for this we need the api keys of the individual apps first.
Go to indexers and click on "Add Indexer". You will see a list like this:
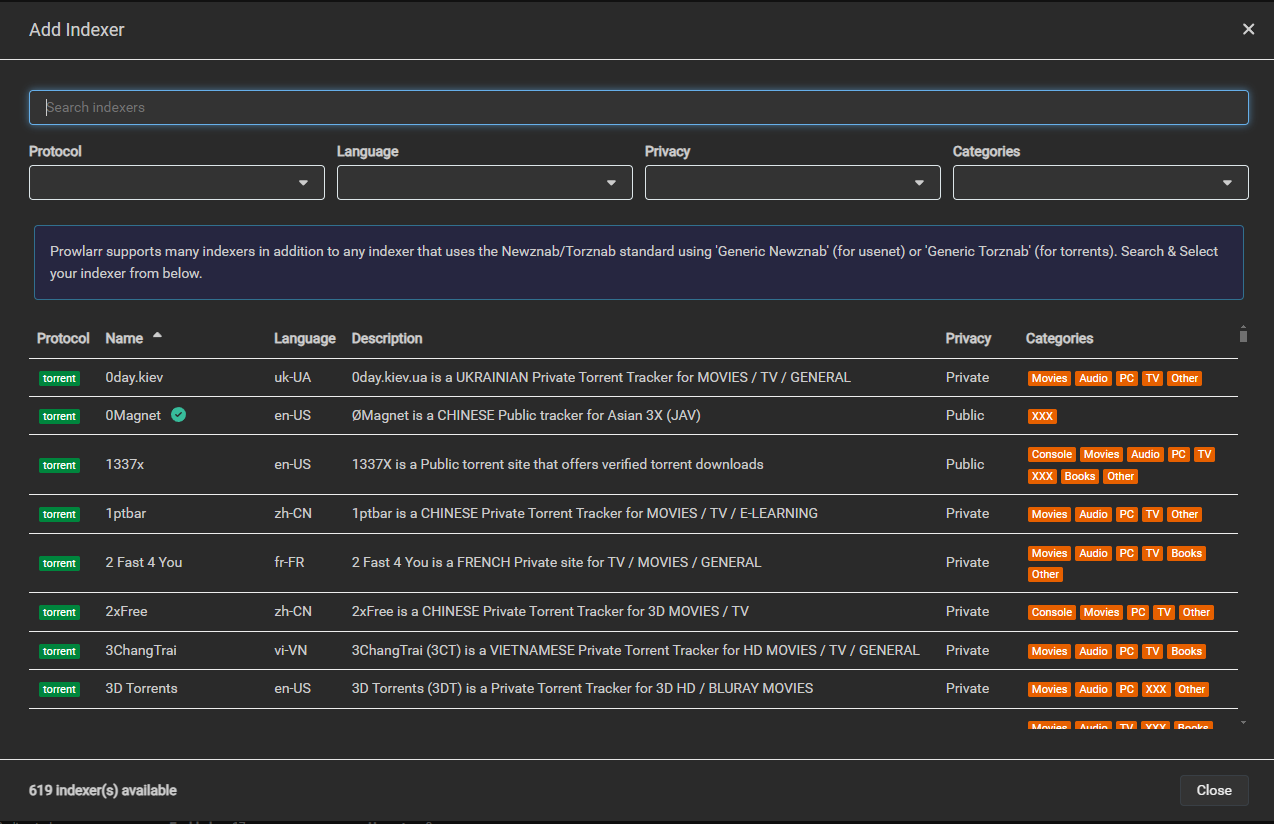
Chose from the list and set up as many indexers as you like. They will be distributed to Radarr, Sonarr, Whisparr, Readarr and Lidarr accoring the respective categories.
Next to setup
Radarr
Same as prowlarr first of all you need to select your authentication method. Also write down the API Key at this point. For initial setup you should go trough those:
- Settings -> Media Management: Set up a base folder for your movies library. Keep in mind this can't be the same directory where torrents will be loaded. It will be the same folder as Plex will access your movies. In my case this is /shares/media/movies. Remember we mounted the 8TB Harddrive to "media" - therefore "movies" is basically directly on the large disk at toplevel.
- Settings - Profiles: Check the profiles for what you want radarr to download. I leave this to defaults but at first this resulted in downloading movies with filesize between 20-50GB each. For my purpose this is way too high and I wanted movies to be smaller as 10GB. There are settings to limit filesize but with my testings this did not work best. I changed the rates under:
- Settings - Quality: when you enable Advanced options here, you can setup "Megabytes per minute". I simply changed this to same values 0 - 95 - 100 for all formats wich results in files being significantly smaller than before. I'm sure there are better settings but for my purpose the result is pretty much satisfying.
- Settings - Indexers: Don't need to setup here as prowlarr will serve these when it's connected
- Settings - Download clients: chose qBittorrent, enter IP, Username and Password.
- Settings - Connect: Chose PlexMediaServer, enter IP and click on "Authenticate with plex". Save.
Sonarr
It's pretty much the same for Sonarr. Just follow the same as for this but chose another root folder to keep your files manged well. In my case I chose /shares/media/series
Lidarr
Same here and also of course chose another root like /shares/media/music. Remember to copy the API Keys.
Whisparr
Exactly the same, whisparr is a fork of sonarr and can be handeled the same. Well the directory of my choice is /shares/media/xxx
Readarr
Honestly I didn't play much with it yet and plan to download audiobooks. So I disabled the download of eBooks in the Profile here. Other than this the rest ist the same. Folder of my choice: /shares/media/books
qBittorrent
Last but not least let's setup the downloader itself. We set password before so let's focus the folder options. Under "Downloads - Saving Mangement" you can set the default path to /shares/temp/download if you follow my folder structure or just set the path of your completed downloads folder.
Activate checkbox "Keep incomplete torrents in:" and set the temp path here - in my case /shares/temp/downloadtmp
I had some permission issues. For this I chmod the files after download. If you experience same you can set ip accordingly. Just enter
chmod -R 777 "%F/"
in the textbox and activate "Run external program on torrent completion"
Connect clients
One thing is missing in prowlarr: We need to setup all the *arr managers under "Settings - Apps". Add Radarr, Sonarr, Lidarr, Whisparr and Readarr.
Note: If no setting for whisparr is available just selct "Sonarr". This works with version v2+ wich is aimed to shows instead of movies. If you'd use V1 Whisparr aimed to movies just use radarr's settings.
You will need the API Keys for all arrs here.
After settings them up, check back in one of the *arrs if the indexers successfully were distributed.
Ombi
Also in Ombi we need to setup connection to radarr, lidarr, sonarr and plex. Under settings go trough "Media Server", "TV", "Movies" and "Music" and setup your connections.
I use google/plex authentication. Activate "Enable Plex OAuth" under "Settings - Authentication" for this.
Homepage
Now as we have many services and individual webpanels we want an easy to use entry point for all our services. We will setup homepage for this. To setup widgets, bookmarks and those, please follow the manual of homepage.
Edit the file /opt/homepage/config/services.yaml to add all of our services. My services.yaml looks like this:
Folder structure
It's essential to have a folder structure to be handled well by all tools. I set up my folders for all those tools like this
| /shares/media | This is where I mounted my 8TB harddrive |
| /shares/temp | This is where I mounted my "temp" 1TB harddrive |
| /shares/media/movies | Root for movies. Setup in radarr as root. Add movie collection in plex with this root |
| /shares/media/series | Root for tvshows/series. Setup in sonarr as root. Add TV show colletion in plex with this root |
| /shares/media/music | Root for music. Setup in lidarr as root. Add Music collection to plex with this root |
| /shares/media/books | Root for ebooks/audiobooks. Setup in Readarr as root. |
| /shares/media/xxx | Root for adult movies. Setup in whisparr as root. Add Movies or TVshow collection in plex with this root |
| /shares/temp/download | This is where I will have qBittorrent to store completed downloads |
| /shares/temp/downloadtmp | this is where incomplete torrents will be held |

comments: 0